
Rooting the Ezviz C1C-B
January 20, 2026
Ezviz recently launched a new public bug bounty program on yeswehack. Having never hacked on yeswehack before, and in need of a new hardware target anyway, I thought it might be a fun new opportunity. What follows is my first step whenever researching a hardware device: dumping the firmware and getting a root shell.
Discovering UART
The scope for Ezviz's bug bounty program includes any camera listed on ezviz's website. Naturally, I bought two of the cheapest ezviz cameras - the C1C-B. Once they arrived, I got to work disassembling the device, and identifying potential debugging interfaces.
Three pads in particular looked like UART. Using a multimeter I probed the pins during the boot sequence and confirmed that my suppositions were likely correct. One pin was ground, another a constant 3.3v (RX or receive) and the last fluctuated (TX or transmit).
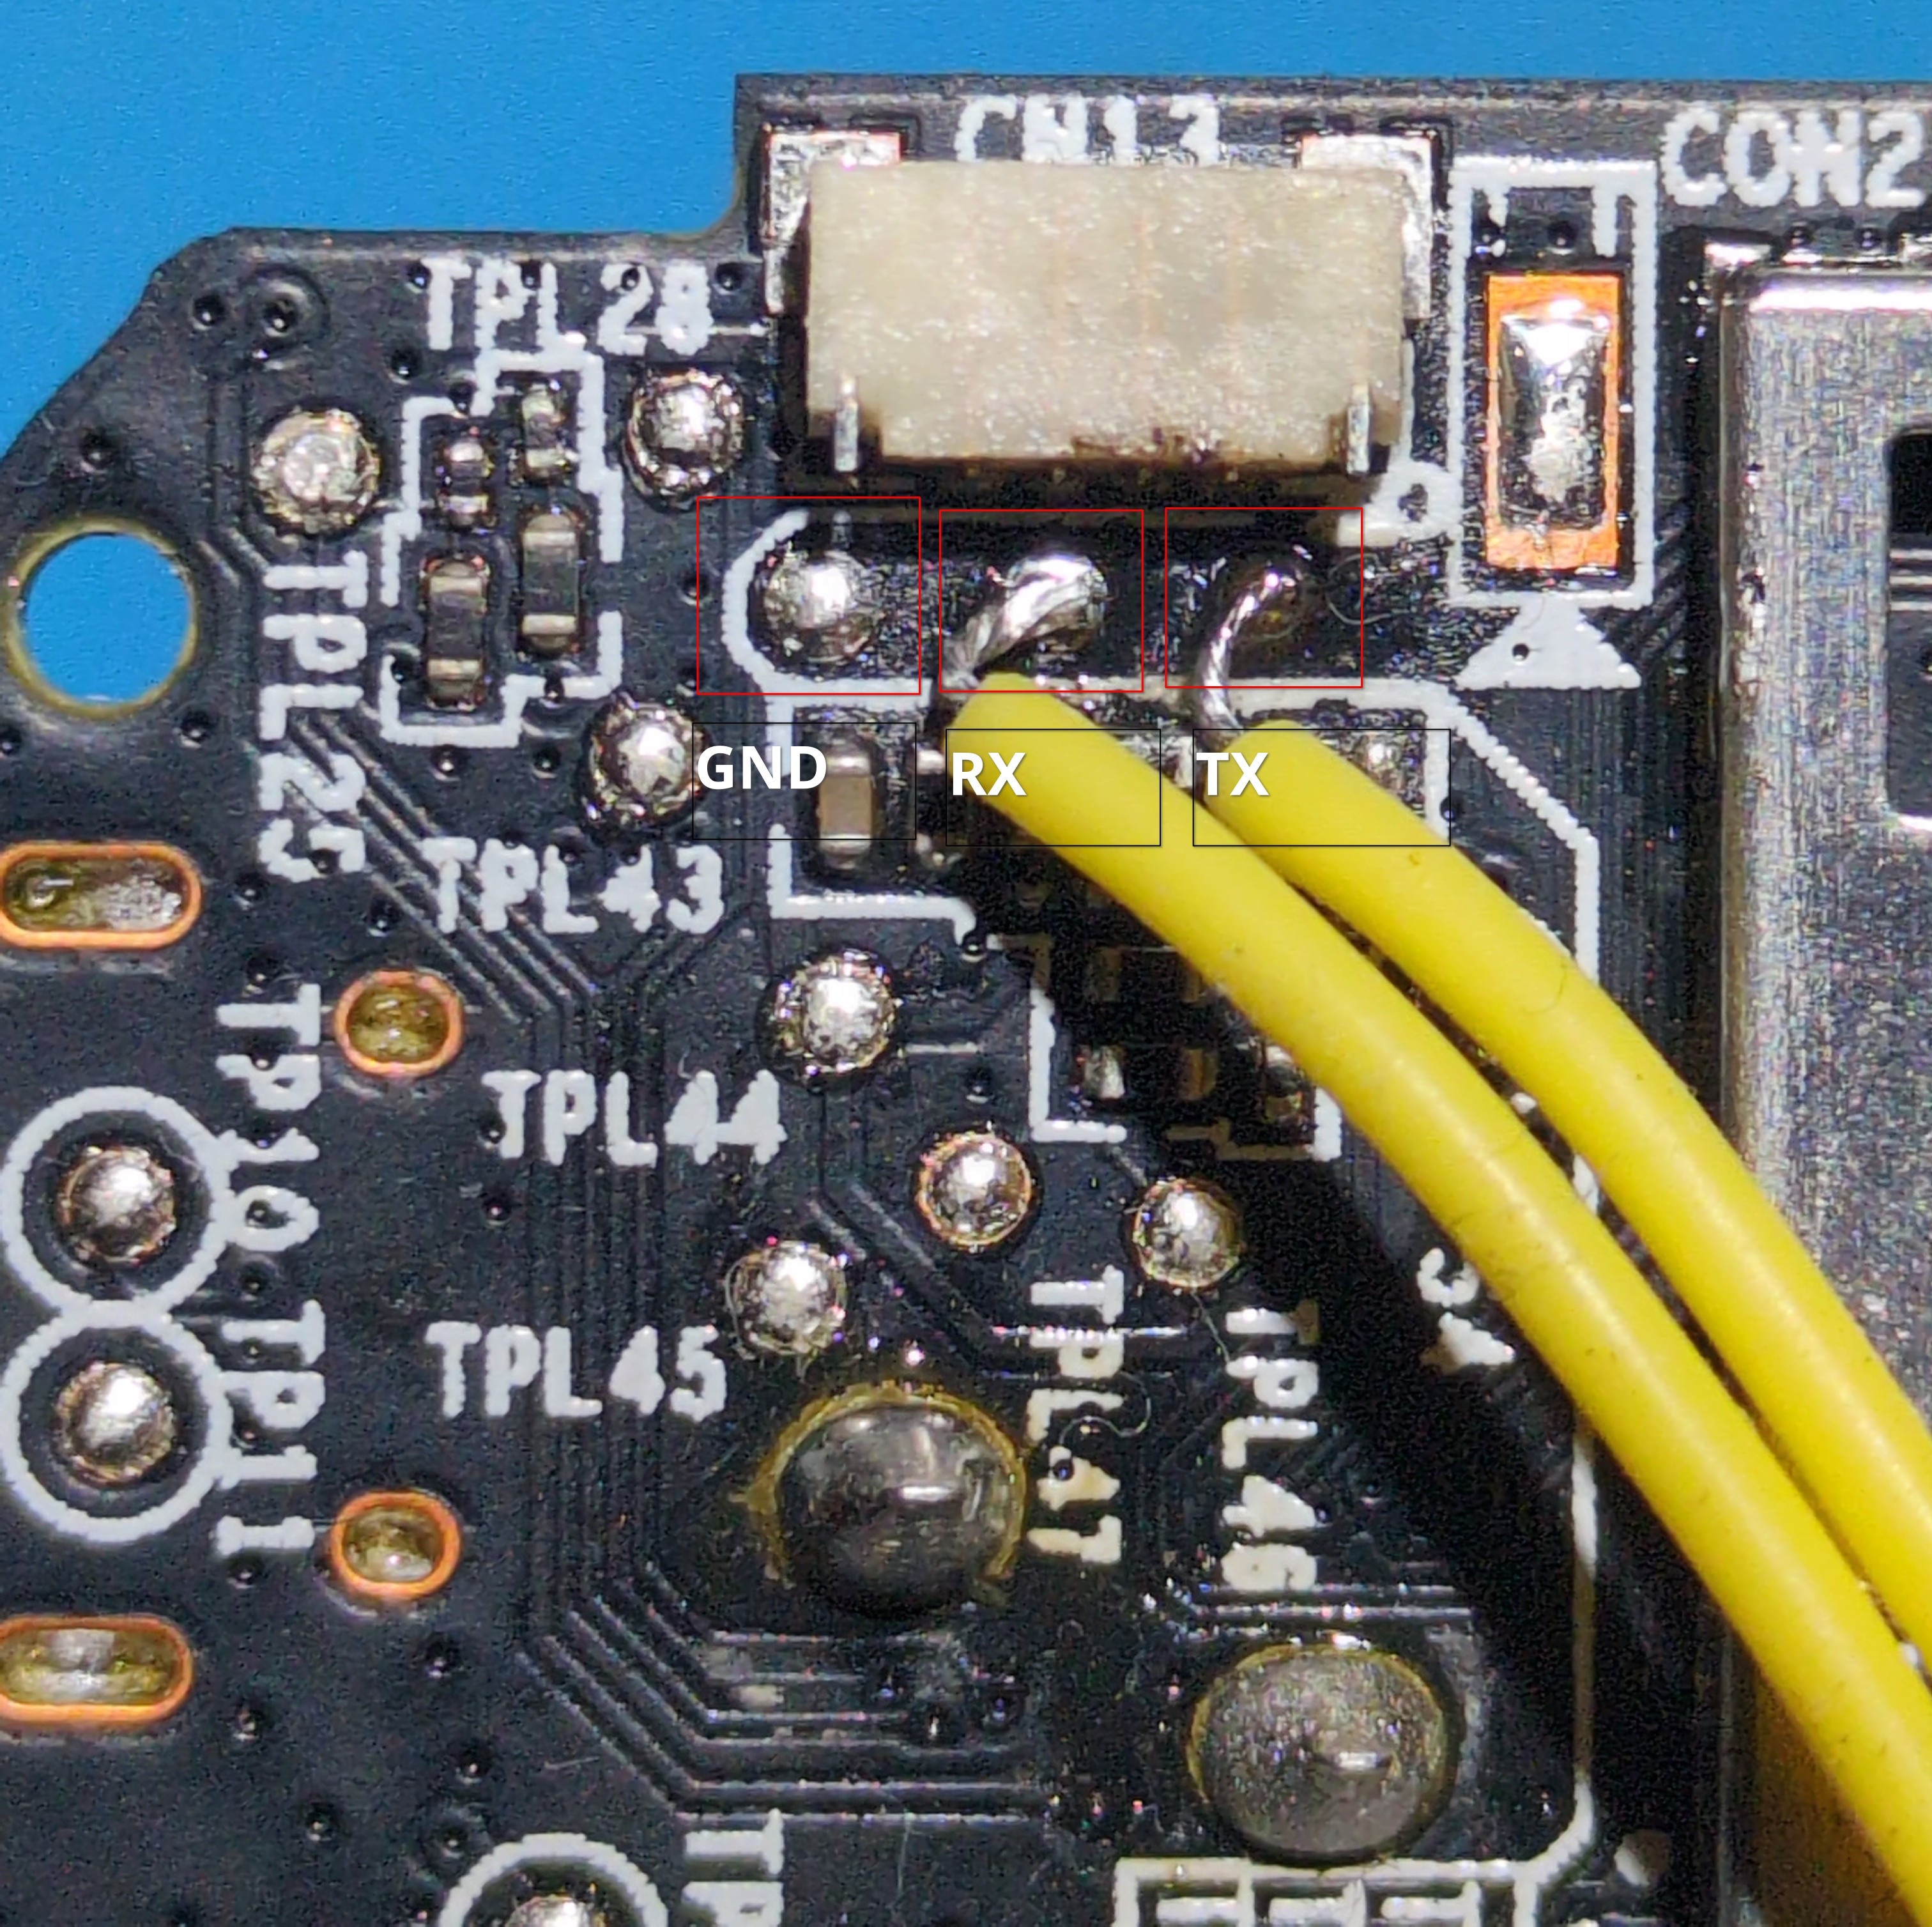
Next, I soldered wires to the pads and connected them to my USB-TTL adapter to read the UART output and potentially get a shell. The C1C-B uses a baud rate of 115200. The output of the boot sequence is as follows:
U-Boot 2010.06-svn104177 (Dec 17 2020 - 19:59:01)
product name:C1C_2020_1080P
spic use FH_SPIC_DUAL_READ && 3bytes mode
Interface:  MMC
  Device 0: Vendor: Man 035344 Snr 452b87e3 Rev: 8.0 Prod: SC200
            Type: Removable Hard Disk
            Capacity: 187746.0 MB = 183.3 GB (384503808 x 512)
Partition 1: Filesystem: FAT32 "           "
reading ezviz.dav
MMC read file ezviz.dav failed,ret=-1!
load_update_file fail
Net:   USB0:   Core Release: 4.00a
scanning bus 0 for devices... 1 USB Device(s) found
       scanning usb for ethernet devices... 0 Ethernet Device(s) found
set to RMII
DM9051-MAC, FH EMAC
Hit Ctrl+u to stop autoboot: 0
load sys to 0xa1000000 ...
spic use FH_SPIC_DUAL_READ && 3bytes mode
sys type 0x00020001
spic use FH_SPIC_DUAL_READ && 3bytes mode
Verify [app0] img successfully...
spic use FH_SPIC_DUAL_READ && 3bytes mode
Verify [rootfs0] img successfully...
spic use FH_SPIC_DUAL_READ && 3bytes mode
Verify kernel successfully...
Done!
## Booting kernel from Legacy Image at a1000000 ...
   Image Name:   Linux-3.0.8
   Image Type:   ARM Linux Kernel Image (uncompressed)
   Data Size:    1382924 Bytes = 1.3 MiB
   Load Address: a0008000
   Entry Point:  a0008000
   Verifying Checksum ... OK
   Loading Kernel Image ... OK
OK
prepare atags

Starting kernel ...

Uncompressing Linux... done, booting the kernel.
starting pid 500, tty '': '/etc/app'
ifconfig: ioctl 0x8913 failed: No such device
ez_spp is lock
After this, the output just hangs and there is no way to send or receive data. I tried interrupting the boot sequence after u-boot had loaded, both with various key inputs and by shorting the CS pin of the SPI flash but was unable to drop into a shell. However, as the boot output suggested, I was able to interrupt u-boot by issuing Ctrl-u early in the boot sequence. Indeed, doing so drops us into a limit u-boot shell:
HKVS #
Issuing help listed a few interesting commands, including the ability to change u-boot environment variables (setenv and saveenv), list the partition table (ezmtdparts), modify memory (mm) and even a few devoted the updating different partitions on the flash. I tried changing the bootcmds and bootargs u-boot environment variables to run /bin/sh and drop a shell but, as is often the case, the environment variables were not actually modifiable.
Firmware dump and analysis
I played around in the u-boot shell for a bit to see if there was any straight forward way to dump the SPI flash, but gave up pretty quickly. The flash chip on the C1C-B is a typical SOP8 SPI flash and quite easy to remove and reattach. Rather than play around with u-boot I took the path of least resistance and simply removed the chip, dumped the firmware with my ch341a, and soldered it back on [1]. The output of the ezmtdparts u-boot command was helpful in determining the structure of the filesystem:
mtd     offset          size            name                    upname
mtd0:   0x00000000      0x00040000      bld                     u-boot_y14.bin
mtd1:   0x00040000      0x00010000      env                     env.bin
mtd2:   0x00050000      0x00010000      enc                     sec.bin
mtd3:   0x00060000      0x00180000      sys0                    uImage
mtd4:   0x001e0000      0x00160000      rootfs0                 rootfs.img
mtd5:   0x00340000      0x00310000      app0                    app.img
mtd6:   0x00650000      0x000b0000      cfg                     cfg.bin
mtd7:   0x00700000      0x00100000      recov                   rtthread.bin
I wrote a couple python scripts to split/rebuild the firmware dump to make modifications easier. The filesystem itself is split between the app.img and rootfs.img partitions.
Shelling
Now that I had the firmware, the next step is to get a root shell so that I can use a debugger/other dynamic analysis tools. Editing /etc/inittab seemed like a good choice. By default the file looks like this:
::sysinit:/etc/app
#::respawn:/sbin/inetd -f -e /etc/inetd.conf
#::wait:-/bin/sh
::respawn:-/usr/sbin/ez_login
::restart:/sbin/init
Simply uncommenting the #::wait:-/bin/sh line should be enough to get a UART shell. Things are, however, never so simple, and indeed ezviz has introduced a number of obstacles to make getting a root shell more difficult (though nothing actually robust like secure boot).
First, the u-boot output references filesystem verification in the boot logs: Verify [rootfs0] img successfully.... Unsurprisingly, the boot process only succeeds if the u-boot successfully verifies that the rootfs partition has not been modified. I don't really know how the verification happens, because it was easy enough to patch out. Using the tool rizin, which guesses a binary's base address using cross references to strings, I determined the base address for the u-boot_y14.bin binary to be at0xa07f3000. I loaded the binary in ghidra at this address and searched for references to the string "Verify [". The verification logic looks like this:
rc = verify_image(uVar1, iVar2, 0x100000);
if (rc != 0) {
    /* succeed */
} else {
    /* fail */
}
In the assembly, the if (rc != 0) line is a bne (branch not equal) instruction. By patching it to b (unconditional branch) instruction, the code will always run the succeed code block - regardless what verify_image returns.
After writing the patched u-boot and rootfs, the u-boot verification will always succeed, but we still don't have a shell. Indeed, there is still no output after the string "ez_spp is lock". I searched the filesystem for references to this string, and, to summarize, during the boot sequence the shell script initrun.sh calls /usr/sbin/ez_lock which locks the UART interface.
I commented out the call to ez_lock and, once again, removed the SPI flash, flashed the modified firmware, reattached the flash chip and rebooted the device.This time I got past the u-boot verification and had full UART output but the device was stuck in a boot loop. As it turned out, I had failed yet another firmware integrity check:
...
CKFL [initrun.sh]...
file name initrun.sh !
check sha256 not match!
...
Once again, I looked for references to the string "check sha256" and found it in libeztools.so. The verification code compares the sha256 hash of the initrun.sh file to an expected hash with memcmp. All I had to do was change a beq instruction to b and reflash the filesystem. This time, all the verification checks passed, UART was fully enabled and - finally - I had a shell!
Postscript: analyzing ezapp
Most of the device logic and interesting attack surface is implemented in the ezapp binary. As a final annoyance and attempt at security through obscurity, this binary is encrypted on the filesystem. During the boot sequence, the binary is decrypted, run, and then deleted. While there is probably many ways to extract it, I modified the firmware once again to explicitly call to /bin/sh after the binary is decrypted, but before it runs/is deleted. Then I was able to extract the binary using the UART shell.
At this point I now have full access to the firmware as well as functioning debugging and can finally begin actual vulnerability research on the device. Hopefully this post is helpful for other bug hunters looking to get started with ezviz!